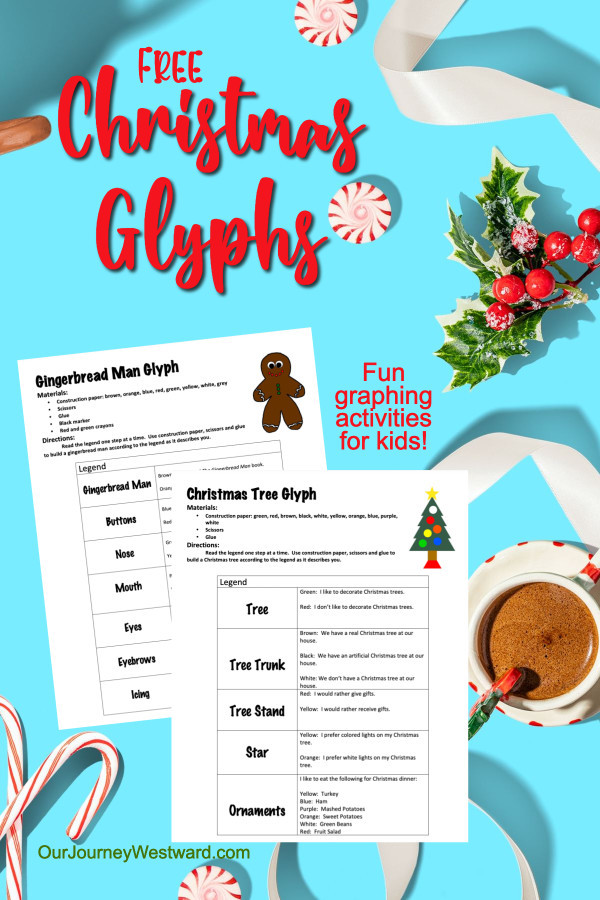
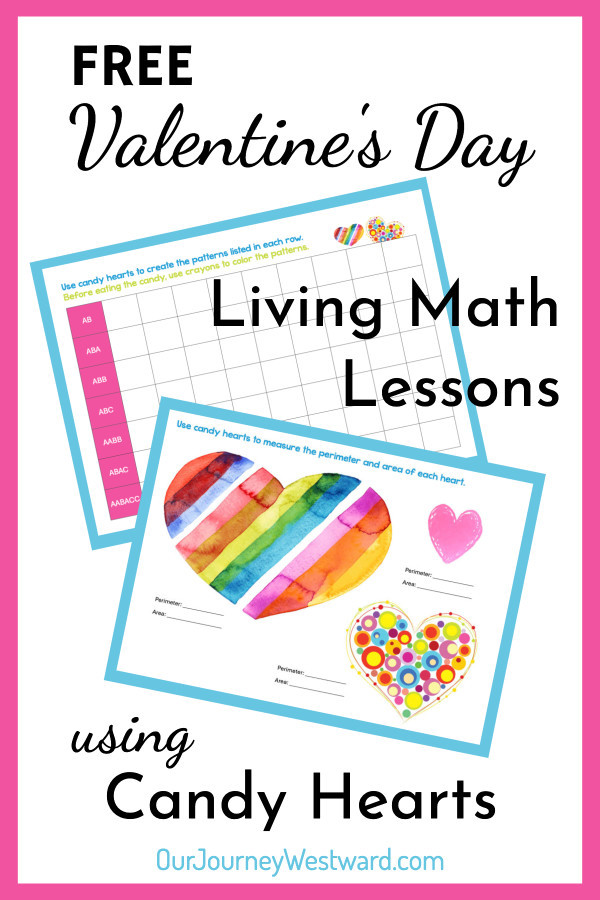
Posted by Cindy on January 23, 2012
A year or two ago, I created a couple of Valentine’s Day printables for you to enjoy with your children. I thought I’d remind you about them since V-Day is just around the corner. Simply click on the graphics to download.
The Measure of a Heart uses candy hearts to practice measuring perimeter and area. After finishing the worksheet, use your candy hearts to measure the perimeter and area of other things around the house.

(In case you need to know…Perimeter is the measurement around an object and area is the measurement of an object’s surface. To measure the perimeter of the hearts on the worksheet, place candy hearts around the edges of the hearts – the dark lines – and count how many it takes to go all the way around. To measure the area, see how many candy hearts will fit inside the hearts on the worksheet.)

The Candy Pattern worksheet (which didn’t transfer to a jpg well and is MUCH nicer in the PDF download) allows your child to make various patterns using candy hearts.

(In case you need to know…each of the letters on the worksheet (A, B, C) represent a different colored candy heart. So, for instance, an ABA pattern, where A represents pink and B represents green would look like: pink, green, pink, pink, green, pink, pink, green, pink. Your child gets to decide which colors represent each letter of the pattern.)

You can find several other fun math related V-Day ideas at Googol Learning.
I’ve been pinning fun ideas on my Valentine’s Pinterest board, too!
For those of you interested in learning how to add more living math into your homeschool, consider Loving Living Math.


Posted by Cindy on December 9, 2011

{Although a silly story (needing some tweaking), the science mystery experiment pictured above is both fun and worthwhile as you step away from the textbooks this Christmas season. Enjoy the Christmas Cookie Mystery with Teacher Directions.}
Below is an article I wrote for CHEK’s December Newsletter. I thought I’d post it here just in case some of you are overwhelmed this Christmas season.
Are you tired yet? By the time December rolls around each year, I’m ready for a break – only to find all the busy moments surrounding the Christmas season staring me in the face! Instead of throwing in the towel on homeschooling in order to manage all the other to-do’s of December, we have “Christmas school”. That’s a fancy term meaning we relax the regular schedule and make the to-do’s part of our school routine.
During these two or three weeks just before Christmas, the textbooks are often replaced with practical things such as menu planning, couponing, baking, party planning and decorating, shopping for presents on a budget, crafting homemade gifts, addressing Christmas cards, practicing for plays and musicals at church, and more. We’ll spend extra time fitting in service opportunities, too.
We also replace our daily Bible routine with one that prepares our hearts to celebrate the birth of Christ. There are so many different Bible schedules and Christmas devotions readily available, even some with learning activities! I’ll mention just a few to get you started. We love completing a Jesse Tree and have done this several different years. We have completed several themed studies relating to Advent, the Symbols of Christmas, and the Names of Jesus. We’re also suckers for good literature. Our very favorite Christmas series is written by Arnold Ytreeide and includes three books (read one book per year) with readings every day of December leading up to Christmas day. If you are new to this series, I would read them in the following order: Jotham’s Journey
, Bartholomew’s Passage
and Tabitha’s Travels
.
Don’t let the craziness of December leave you feeling overwhelmed and spent. Enjoy your family. Enjoy your homeschool. Enjoy the to-do’s. Enjoy the extra-gushy time with our Lord and Savior.
Posted by Cindy on November 2, 2011
Got candy? We do, and we’re having so much fun using it during living math lessons! This year we added a little science classification to the mix, too. Fun! Fun! Fun!
Math

My preschooler made a concrete graph with his candy.

He had to sort the candy into groups before we could graph them and he created the group names all by himself – gum, chocolate, suckers, crunchy, chewy and hard.

After completing all sorts of averages based on different groupings of the candy, Caleb (6th grade) created this graph using Excel. (This is another great computer integration activity for those of you who’ve asked me to share more about how we use the computer in our homeschool!)
Science

Not a great picture, but I wanted you to see the entire concrete classification system my 6th grader made with his candy. {A classification system is otherwise known as a taxonomy, which we compared to the classification system for plants and animals.}

Beginning with the main group of ‘candy’, Caleb decided how to break the large group into two smaller groups. He came up with ‘chocolate’ and ‘non-chocolate’ as his descriptions.

For each new category, he continued breaking the groups down into two new categories until he ended up with each specific type of candy in it’s own pile.

Finally, we walked through each candy’s “classification”. An example from our taxonomy chart -Candy; chocolate; bright wrappers; made with peanuts; made with peanut butter, crunchy, Butterfinger. Besides being a science activity, this also fits into the category of logic!
Check out some other candy math lessons we’ve posted in the past, too!
Posted by Cindy on October 31, 2011
I know I’m a little late in posting this, but the month of November is still perfect for some pumpkin fun!
Actually, I’m a little late in posting a lot of things. My goal this week is to polish and publish as many posts as I can before The Heart of the Matter’s 10 Days of …. Series begins next week. Did I mention I was taking part in that again? I know I mentioned it on my Facebook page, but just in case you missed it, I’ll be writing TEN days of posts on the topic of Values Training beginning next Monday, Nov. 7th! There are lots of wonderful blogs participating, each with exciting topics!

Anyway, off to today’s post – a living math lesson with pumpkins! All our children participated according to their abilities – from the 4yo to the 14yo. The 11yo and 14yo were expected to measure with complete accuracy, while the 4yo dabbled in learning how to measure. He used standard (rulers) and non-standard (blocks) measuring tools.

We measured the height and width of each pumpkin.

We measured the weight with our bathroom scale. A nice kitchen scale (which we don't own) would've provided more accurate measurements.

We measured the circumference and the big kids used formulas to determine the diameter and radius.

Here's the beginning of Mahayla's record keeping.

When Eli saw his big brother and big sister keeping records, he insisted that he have a record keeping sheet, too. W = wide and T = tall.

We did a water displacement activity to find the volume of our pumpkins (you'll see below), but we didn't have a big enough container marked with measurements to make the pumpkin displacement accurate. To demonstrate the correct way to find volume, we used a measuring cup and potato. At least this gave them a better idea what we were doing wrong in measuring the volume of our pumkins.

In measuring the volume of our pumpkins, we made our own measurement bucket for estimations, but realized our measurements probably were not perfect, nor could we see through the bucket to see exact water levels. At least they have the experience and understand the flaws in our trial.

Of course, we couldn't end the lesson without carving our pumpkins! Through this process, we continued to measure width of the skin, depth of the cavity, and such. We also talked "science" as we discussed the pumpkin parts and their functions.

And, we couldn't end the lesson without a pumpkin treat. These are simple pumpkin bars that are so moist, they don't even need icing!
I hope you’ll find a few leftover pumpkins at the market and have your own living math lesson!
Posted by Cindy on July 19, 2011
I know it’s not quite time for the Advent activities from our new $5.00 mini-unit Nature Study Through the Holidays, but I wanted to show you the blessings that came from one of the suggested walks this past week. (Also, to let you know that the suggestions we’ve made each week of Advent can certainly be used at other times as well!)
Week 2 of Advent focuses on the topics of Bethlehem and Peace. During one walk, you are encouraged to find the peace as seen in nature’s leftovers – like dried flower stalks, single leaves hanging from trees or fallen nuts. Since we suggest you use this activity as a photo walk, that’s just what my children and I did. I’m sharing many of our photo finds with you.

A single cluster of maple seeds hangs on, waiting for the winds of winter to give them a final push.

These burrs haven't found their way onto some unsuspecting animal or person yet.

The giant remains of a bull thistle are intimidating!

As winter snows and ice approach, queen Anne's lace waits as a lovely resting place for them. If you get an ice storm, look for the fancy wands that are created over this dried flower.