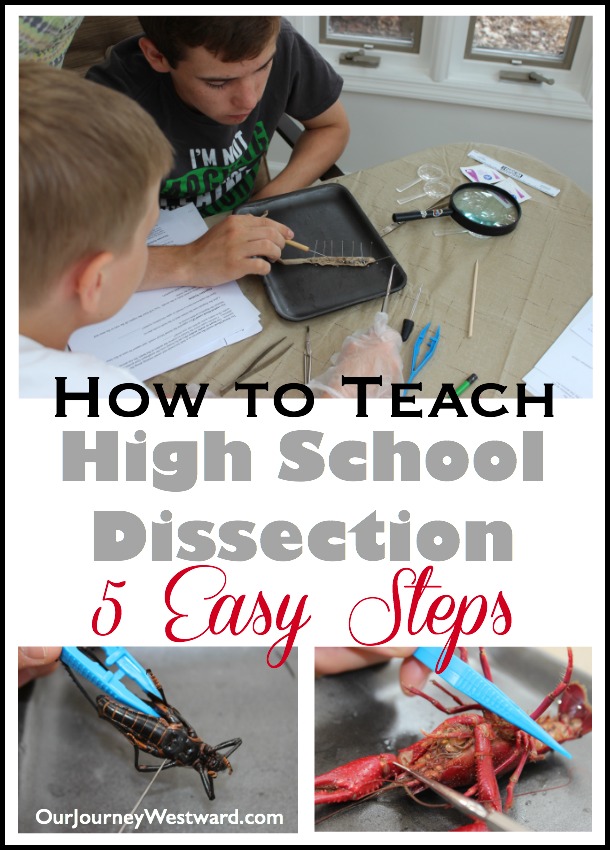
How To Teach High School Dissection
Do you need to know how to teach high school dissection? I did!
When my oldest daughter took biology, we were blessed with a wonderful co-op teacher who specialized in dissection and I gladly turned the job over to her. When my son took biology last year, dissection was all on me. I wasn’t at all grossed out by the idea, but I didn’t really know what to do. While we have done consistent nature study for years and years, “real” dissection was never part of those lessons. And this was high school!
This post contains affiliate links.
Now, I should admit before I go any further that I did have my wonderful daddy at my disposal. He got a biology degree of some sort in college and was happy to be with us on dissection day. However, all the prep was on me and the prep was an integral part of our study!
How To Teach High School Dissection
I shouldn’t have been surprised at all to find everything I needed for high school worthy dissection instruction right at my fingertips.
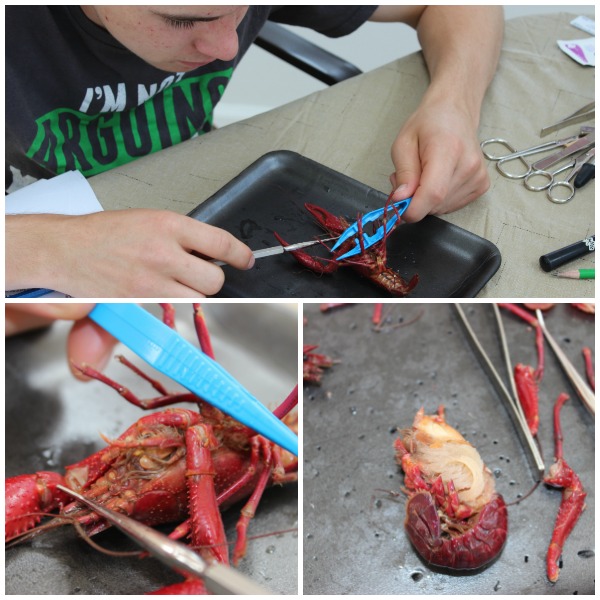
1. Order a Dissection Kit
I was surprised to find that I could order a set of four dissection samples for less than $20! It included four animals from different classifications, so we had a wide variety of animal structures to observe. It even included a decent set of tools! (Occasionally, this set is not available. When that happens, you can buy a larger set of specimens without the extra tools and information.)


Other Important Supplies
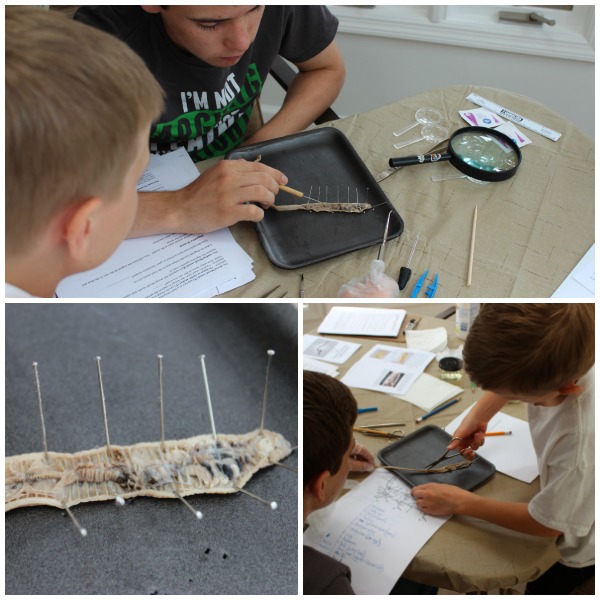
- If you want to get super precise with cutting the animals apart, I would suggest a more professional dissection tool kit. It made quite a difference in our ability to see all the body structures and organs.
- T-pins or regular straight pins are imperative.
- Have several old styrofoam trays ready for pinning the critters down as you dissect. If you want to get really serious, you could purchase a reusable dissecting pan instead.
- Don’t forget latex gloves and safety glasses. P.S. My boys didn’t keep either of these on the entire time. Nothing horrible happened.
If you have needs besides these four animals, there are several other online ordering options for dissection: a fetal pig, a rat, a heart, a brain, or an eye.
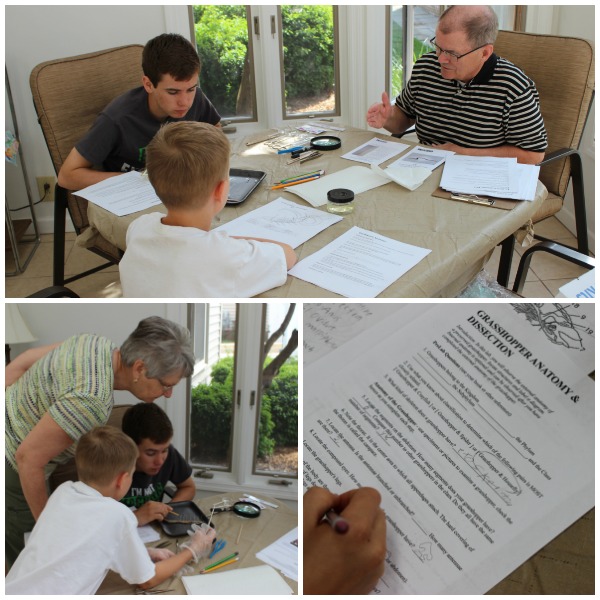
2. Research the Animals Before Dissecting
For each of the four animals in our kit, my son used the computer for the following research assignments:
- Write the entire scientific classification (taxonomy) of the animal. Make notes beside each category detailing what characteristics constitute that category. For instance, earthworms belong to the phylum annelida. I expected my son to be able to tell me that all animals classified as annelids are segmented, etc.
- Label a picture of the animal with its external and internal parts and tell the function of each part. (For this, I simply typed into the search engine, for example, “label parts of an earthworm” then clicked on “images” to see what printables were available. I printed off what best suited our purposes, oftentimes needing to keep a master copy as an answer key for me and whiting out the preprinted labels so my son could find his own answers.)
That’s it! As you can see, though, there was quite a lot of research necessary in these two little power-packed assignments. It took him at least a day or two to complete the assignments for each animal.
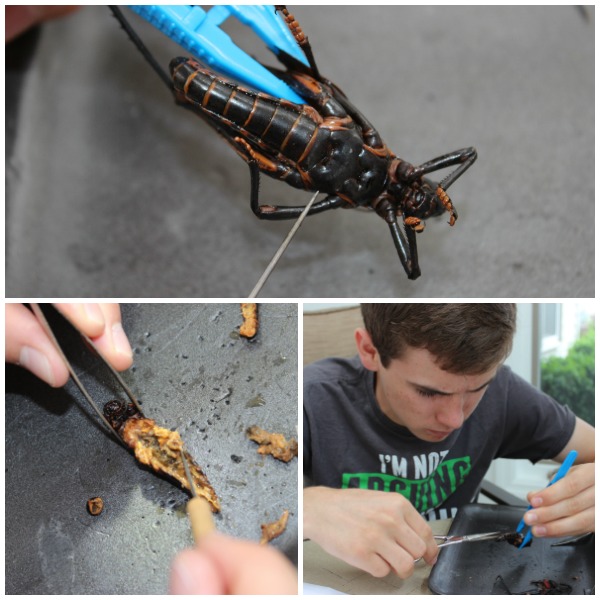
3. Watch Dissection Videos Before Dissecting
We were all new to “real” dissection, so I thought it best to watch each animal dissected by a professional on YouTube before we jumped in. I’m SO glad we did this! Not only did it give us good instruction about how/where to cut, the teachers would give us all kinds of wonderful detail about the animal parts and functions, as well as other interesting tidbits. The videos weren’t very long either, so well worth the time spent.
Crayfish Dissection Videos Part 1, Part 2
Frog Dissection Videos Part 1, Part 2
Since we were planning to do all our dissections in a one-day marathon with my father, we watched all the videos prior to doing any of the dissections. (One animal per day – so four days of watching videos total.) If I were to do it over, I would have watched a dissection video one day and then dissected the same critter the next day. While my son retained a great deal from the videos when it came to dissection day, I think it would’ve been better to focus on one animal at a time.
P.S. It’s hard to dissect four animals in one day! So hard, in fact, that we got through only three of them and had to call it quits. The frog was done another day without the luxury of my dad helping out.
4. Follow a Dissection Guide
The dissection kit I bought came with some very basic directions sheets for each animal, but I located some that were much more detailed – and appropriate for a high school course.
External and Internal Crayfish Dissection Guides
External and Internal Frog Dissection Guide
You might be thinking that it’s good enough to have done the animal research and watched the dissection videos. While those are certainly wonderful activities, I still believe actually doing the dissections is very important. There really is much to learn from seeing in person how one system works with another or how similar the systems from one animal to another are. Also, when you find eggs in an ovary or see how an open-circulatory system works it’s really just amazing and can’t be matched by watching it on video.
5. Give a Test
I actually treated the dissection as the test! You’ll notice the dissection guides I’ve linked for you are quite detailed and required my son to recall much information from his research. I felt like any additional test would have been overkill. You could certainly create a great comprehensive test using questions from the guides if you like, though!
Multi-Age Possibilities
The best part about teaching dissection at home with a high school student, is your third grader can join in and learn, too! I didn’t make Eli do as much research or fill out every square of the dissection guides like I expected from Caleb, but together we worked on classification charts and labeling part on worksheets. He was right in the middle of the dissection and learn much more than I would’ve expected from an elementary student!
Have you done any dissections with your children? I’d love to hear what you dissected and how it went!
Related Posts


Make Science Meaningful and Fun
Experience a free No Sweat Nature Study class to see how easy and engaging science can be.
Kid-friendly science through the lens of nature study
Creative nature journaling with every lesson
Flexible and fun for the whole family
Watching videos before dissecting is a fantastic idea!! I was homeschooled through high school and though the dissections still turned out fine, watching videos beforehand would have made a huge difference with seeing what I was supposed to be looking for and how to cut into different sections and such. Great idea!
Hi Cindy, Im getting ready to teach biology to my 15 year old. Did you use a curriculum? I’m curious as to if what you did was a biology credit. I was able to purchase a used copy of Apologia Biology and looking through the list I need a microscope. I was wondering if you did more for Biology than the dissections? My son is not at all looking forward to biology ( he wants to major in history) and I just want to get him through his biology!
Michele, dissection was one small part of our biology curriculum for my son. You can see the rest of our plan at https://ourjourneywestward.com/high-school-science-isnt-working/. 🙂
My daughter used Apologia and did her dissection during a co-op class.
Very helpful! Thanks!