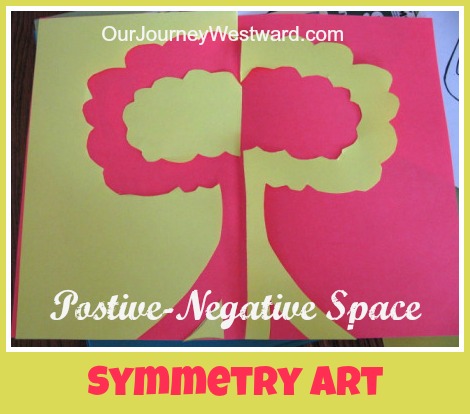
Positive Negative Symmetry Art: A Creative Math and Art Combo
Looking for a meaningful way to combine math and art in your homeschool? Positive negative symmetry art is the perfect project! This hands-on activity introduces important concepts like symmetry, spatial awareness, and the artistic principles of positive and negative space—all in one simple lesson. It’s a fantastic example of how living math can bring abstract ideas to life through engaging, real-world learning.
Whether your child is a budding artist, a visual learner, or simply needs a creative break from the workbook, this project delivers a beautiful blend of fun and function.
What Is Positive Negative Symmetry Art?
Before jumping into the project, let’s define two key concepts that make this lesson both artistic and mathematical.
- Positive space is the part of an artwork that contains the subject.
- Negative space is the area around and between the subject.
When you combine these with a line of symmetry—a line that divides something into two mirror-image halves—you get dynamic, balanced artwork that visually reinforces math concepts like shape, proportion, and reflection.
This art lesson is simple to prepare and yields stunning results. Better yet, it sharpens your child’s understanding of symmetry and spatial relationships—both foundational in geometry.
How To Make Positive Negative Symmetry Art
You’ll only need a few supplies to get started:
- Two sheets of contrasting colored paper (same size)
- Pencil
- Scissors
- Glue stick
Step-by-step instructions:
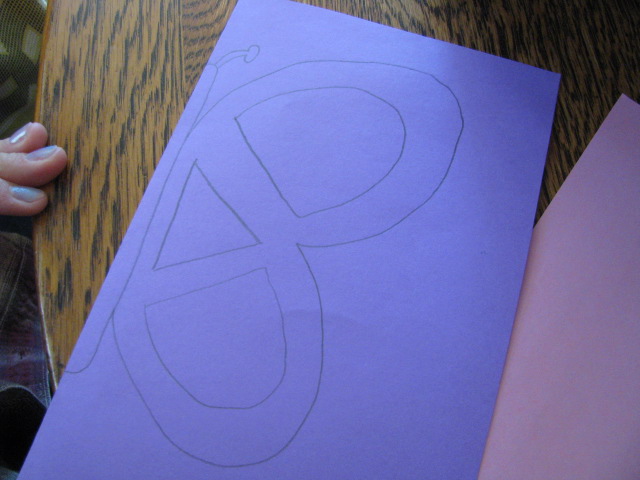
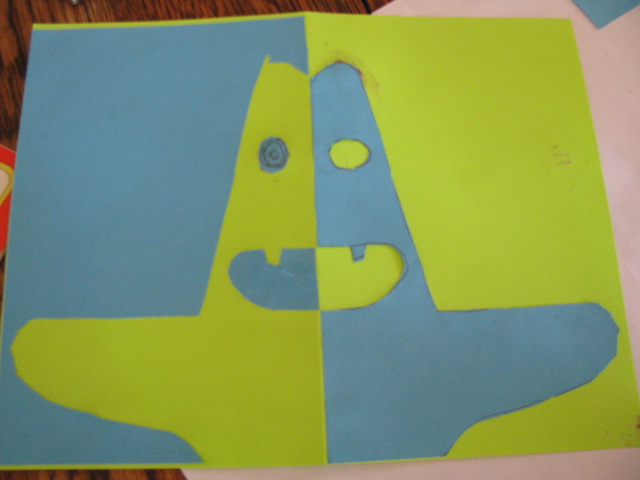
- Fold both sheets of paper in half to create a vertical line of symmetry. Set one sheet aside as your background.
- Cut the second sheet in half along the fold and discard one half—you’ll only use the other.
- On the remaining half-sheet, draw half of a shape along the folded edge. Think about what kinds of shapes would be interesting in duplicate! Hearts, leaves, abstract swirls, or geometric designs all work well.
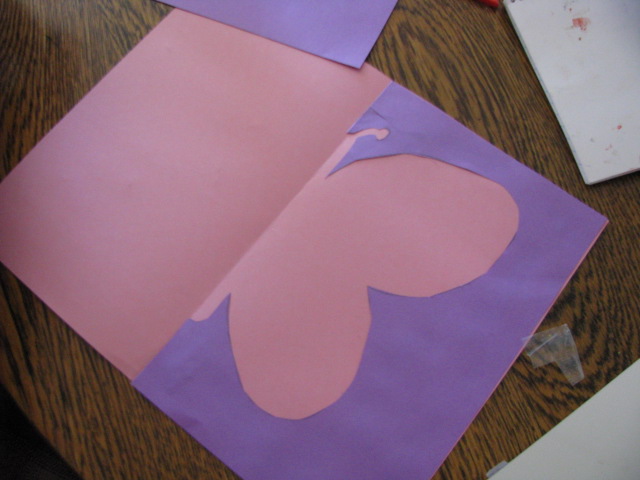
- Carefully cut out your shape, saving every piece. The part you cut out is your positive space, and the part you cut from (the paper with the hole) is your negative space.
- Place your background paper in front of you, with the folded edge still visible. This is your full sheet.
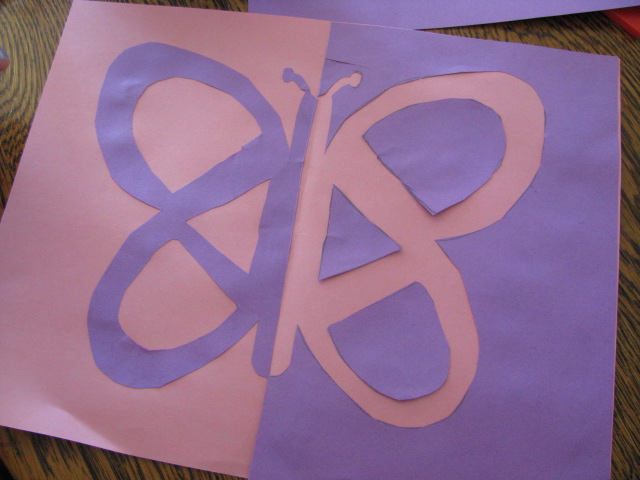
- Glue the positive space shape on one side of the fold. Place the negative space piece on the opposite side, aligning the edges exactly along the line of symmetry.
- Adjust as needed, then glue everything down.
And just like that—you’ve created a mirrored design that teaches both art and math concepts in one go!
Teaching Tips for Homeschool Parents
This activity works well for a variety of ages and ability levels. Younger children can stick with basic shapes, while older students might challenge themselves with intricate or abstract designs. Here are a few more ideas to extend the learning:
- Discuss real-world symmetry found in nature (leaves, butterflies, snowflakes) or architecture (windows, doorways).
- Incorporate vocabulary by labeling the positive and negative spaces on the artwork.
- Connect to geometry by identifying shapes, angles, or symmetry types.
You can also tie this lesson into a larger unit study on symmetry, spatial awareness, or even art history by looking at famous works that use positive/negative space creatively (like M.C. Escher’s).
This project was added to my Living Math Pinterest board, which is full of cross-curricular lessons that bring math to life. It’s just one example of how a single hands-on project can lead to deeper understanding—and a lot of fun, too!
What Kind of Art Is Symmetry Art?
Symmetry art falls under the broader umbrella of spatial art or conceptual art with mathematical foundations. It’s a creative form of visual math—art that explores spatial relationships, symmetry, geometry, and balance.
This type of art invites children to:
- Think critically about space and shape
- See how math and art intersect
- Experiment with mirroring, patterning, and design
- Observe visual balance and contrast
It’s similar to the optical illusions and tessellations made famous by M.C. Escher, but also connects to broader concepts like geometry in art, symmetry in nature, pattern design, and architecture.
Books To Explore Spatial and Mathematical Art with Kids
Here’s a list of living books, picture books, and activity guides that fit beautifully with this type of lesson:
Picture Books to Inspire Creative Thinking and Spatial Awareness
- Swirl by Swirl: Spirals in Nature by Joyce Sidman
Explores patterns and symmetry in nature with lyrical language and gorgeous illustrations. - The Greedy Triangle by Marilyn Burns
A playful introduction to shapes and how they relate to the world around us. - Round Is a Mooncake: A Book of Shapes by Roseanne Thong
Simple, cultural, and rich in visual storytelling—connects math to everyday life. - Seeing Symmetry by Loreen Leedy
It is an excellent introduction to symmetry with clear illustrations and interactive elements. - Snowflake Bentley by Jacqueline Briggs Martin
Beautifully ties symmetry to real life through the true story of a man who photographed snowflakes.


Books That Introduce Escher-Like Concepts (Symmetry, Patterns, Optical Illusions)
- If… A Mind-Bending New Way of Looking at Big Ideas and Numbers by David J. Smith
Not strictly about art, but excellent for big-picture spatial reasoning and perspective. - Look Again! by Tana Hoban
Black-and-white photographs that challenge perception—great intro to negative space! - Optical Illusions by DK Publishing
Visually engaging and perfect for kids who love puzzles, patterns, and tricking the eye.


Hands-On Math and Art Explorations
- Math Art and Drawing Games for Kids by Karyn Tripp
Dozens of projects connecting math and creativity. Includes symmetry, tessellations, and more. - Pattern Blocks with Activity Cards
A versatile tool for exploring symmetry, reflection, and geometric design. Kids can follow challenge cards or create their own patterns. - Geoboards
Use rubber bands and pegs to explore angles, shapes, and symmetrical designs. It’s great for tactile learners and visual thinkers alike.


Exploring art through the lens of math is a powerful way to encourage both creativity and critical thinking. Positive negative symmetry art offers a meaningful introduction to concepts like balance, shape, and spatial reasoning—all while giving your child the freedom to express themselves through design. When you pair engaging hands-on lessons with rich, living books, you’re not only teaching across subjects; you’re nurturing a love of learning that lasts.
Make Science Meaningful and Fun
Experience a free No Sweat Nature Study class to see how easy and engaging science can be.
Kid-friendly science through the lens of nature study
Creative nature journaling with every lesson
Flexible and fun for the whole family
Neat project!!!
That’s so cool!!! I love the positive negative art!!