
Chromatography with Leaves: A Colorful Fall Science Experiment
Chromatography with leaves is a fascinating experiment that reveals some of the pigments hidden inside green leaves. Kids will explore the chemistry of chromatography while learning how leaf pigments contribute to autumn colors.
This post contains affiliate links.
What Is Chromatography?
Chromatography is a scientific method used to separate a mixture into its individual parts. In these experiments, we will use chromatography to separate the pigments that create colors in marker ink and leaves.
As a liquid moves through paper, it carries pigments with it. Some pigments dissolve more easily in the liquid, while others cling more strongly to the paper. Because the pigments move at different rates, they gradually separate into bands of color.
The liquid that travels through the paper is called the solvent. The movement of the solvent through the paper is caused by capillary action.
Start with Marker Chromatography
I like to introduce chromatography with water-soluble markers before experimenting with leaves. Markers usually produce clear results, making it easier to understand how chromatography works.
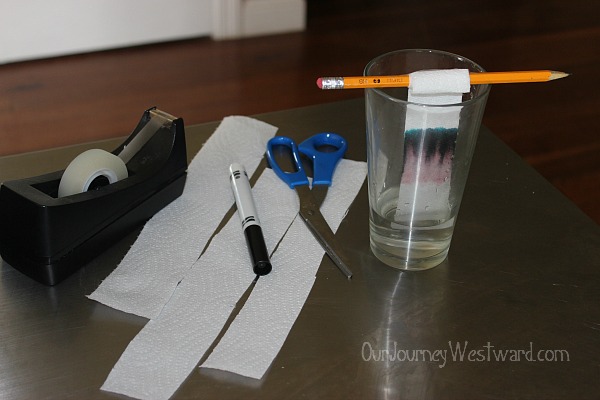
Materials
- Black water-soluble markers
- Other water-soluble marker colors, if desired
- Clear glasses
- Water
- White paper towels cut into 1-inch strips
- Pencils
- Tape
If possible, gather black markers from several brands. Different manufacturers create black ink using different combinations of colored pigments, so comparing brands can produce interesting results.
Directions
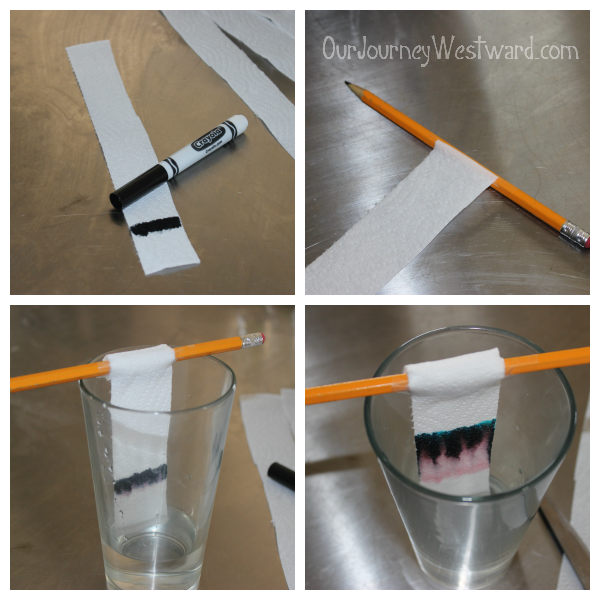
- Pour about 1 inch of water into a clear glass.
- Use a black marker to draw a thick horizontal line across a paper towel strip. Place the line about 1 inch from the bottom of the strip.
- Tape the top of the paper towel strip to a pencil.
- Rest the pencil across the top of the glass. Adjust the strip so that only the bottom edge touches the water. The marker line must remain above the water.
- Watch as the water travels up the paper towel through capillary action.
- Remove the strip before the water reaches the top. Lay it flat to dry.
- Repeat the experiment with different black markers or other dark marker colors.
As the water travels through the ink, it carries the pigments up the paper. Pigments that dissolve more readily in water generally travel farther. Pigments that are more strongly attracted to the paper generally travel a shorter distance.
The colors you see on the finished strip are some of the individual pigments that were blended to make the marker ink.
Record the Results
Draw the finished chromatography strips in a science or nature journal. Label each strip with the marker color and brand.
Consider these questions:
- How many colors separated from each marker?
- Did all the black markers contain the same pigments?
- Which pigment traveled farthest?
- Which pigment traveled the shortest distance?
- Did any marker produce an unexpected color?
- What do the results suggest about how each ink was made?
Why Do Leaves Change Color?
Leaves contain several pigments. Chlorophyll is the green pigment that absorbs light energy for photosynthesis. During the growing season, leaves contain so much chlorophyll that its green color masks many of the other pigments.
Leaves may also contain carotenoids, which produce yellow, orange, and golden colors. When the days shorten and temperatures cool, trees stop producing as much chlorophyll. As the chlorophyll breaks down, some of the yellow and orange pigments that were already present become easier to see.
Red and purple autumn colors often come from pigments called anthocyanins. Unlike carotenoids, many anthocyanins are produced in the leaves during autumn. This means a green leaf chromatography experiment will not necessarily reveal every color the leaf will display later.
Chromatography with Leaves
Now that your kids understand how chromatography separates marker pigments, they can use the same basic process to investigate pigments in green leaves.
Late summer or early fall is a wonderful time to complete this experiment. Collect green leaves shortly before the leaves in your area begin changing color.


Before beginning, you may enjoy reading a book about why leaves change color. Discuss photosynthesis, chlorophyll, and the pigments that create yellow, orange, red, and purple leaves.
Choose Leaves for the Experiment
Fresh, dark green leaves usually produce the best results. Avoid leaves that are dry, wilted, dusty, or especially waxy.
Collect several leaves from one tree or plant for each sample. You might compare:
- Different tree species
- Dark green and light green leaves
- Leaves growing in full sun and shade
- Tree leaves and garden leaves
- Green leaves and leaves beginning to change color
Do not mix several kinds of leaves in one sample. Keeping each species separate will make comparisons easier.
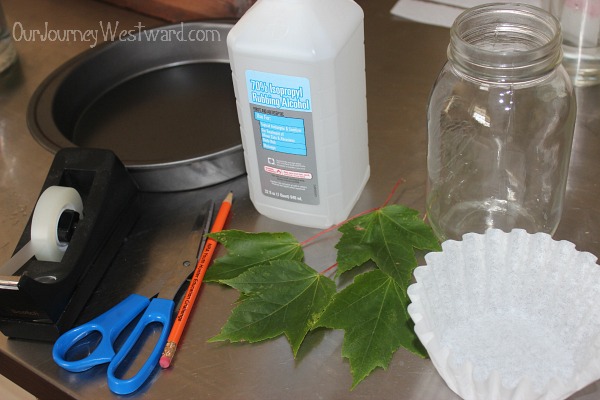
Materials
- Several fresh green leaves of the same kind
- Rubbing alcohol
- Clear, heat-safe glasses or jars
- A shallow pan or bowl
- Hot tap water
- Plastic wrap
- Coffee filters or white paper towels
- Pencils
- Tape
- Scissors
- A spoon or other tool for crushing the leaves
Safety Note
Adult supervision is required for this experiment. Rubbing alcohol is flammable and should be handled by an adult in a well-ventilated area.
Keep rubbing alcohol away from flames, candles, stovetops, sparks, and other heat sources. Heat the water separately before bringing it to the experiment area. Do not heat rubbing alcohol directly, and do not ingest any of the experiment materials.
Prepare the Leaf Pigment
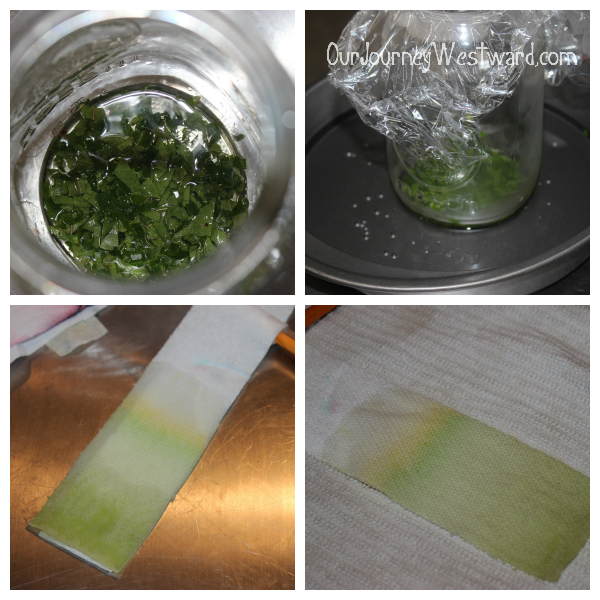
- Tear several fresh green leaves into very small pieces. Avoid using large stems or thick veins.
- Place the leaf pieces in a clear, heat-safe glass or jar.
- Add just enough rubbing alcohol to cover the leaf pieces. Using too much alcohol will dilute the pigments and make the results harder to see.
- Crush and stir the leaves with the back of a spoon until the alcohol begins turning green.
- Cover the glass tightly with plastic wrap.
- Pour hot tap water into a shallow pan or bowl.
- Place the covered glass containing the leaves and rubbing alcohol into the hot water. Be careful not to let water enter the glass.
- Allow the glass to sit in the hot water for about 30 minutes. Swirl the covered glass gently every few minutes. If the water cools, an adult can replace it with fresh hot tap water.
- Continue soaking until the rubbing alcohol becomes a strong, dark green. The darker the extract, the more likely you are to see separate pigment bands.
Prepare the Chromatography Strip
- Cut a coffee filter or white paper towel into a strip about 1 inch wide. The strip should be long enough to reach near the bottom of the glass while still hanging from a pencil placed across the top.
- Draw a light pencil line across the strip about 1 inch from the bottom. Do not use a pen or marker because its ink may separate and interfere with the results.
- Once the leaf extract is dark green, uncover the glass.
- Place a small drop of the leaf extract in the center of the pencil line. Allow it to dry.
- Add another drop to the same spot and allow it to dry again.
- Repeat this process several times. Concentrating the pigment in one small area will help produce clearer bands.
- Pour a shallow amount of the remaining green alcohol extract into a clean glass. You only need enough liquid to touch the bottom edge of the paper strip.
- Tape the top of the strip to a pencil and rest the pencil across the glass.
- Lower the strip until its bottom edge barely touches the liquid. The concentrated pigment spot and pencil line must remain above the liquid.
- Cover the top of the glass loosely with plastic wrap to slow evaporation.
- Allow the solvent to travel up the paper. This may take 30 to 90 minutes.
- Remove the strip before the solvent reaches the top.
- Immediately use a pencil to mark the highest point reached by the solvent. This is called the solvent front.
- Lay the strip flat to dry.
- Repeat the experiment with other types of leaves so you can compare the results.
What Should You See?
Leaf chromatography does not always produce bands as bright as marker chromatography. You may see several shades of green, yellow-green, yellow, or yellow-orange.
Possible pigment bands include:
- Chlorophyll b: yellow-green
- Chlorophyll a: blue-green
- Xanthophylls: yellow
- Carotenes: yellow-orange or orange
The exact results will depend on the leaf species, the leaf’s condition, the strength of the extract, the paper, and the solvent.
The experiment may reveal pigments that are difficult to see when chlorophyll dominates the leaf. However, it cannot reliably predict every color the leaf will turn in autumn. Red and purple anthocyanins may not be present in large amounts until autumn color change begins.
Troubleshooting Leaf Chromatography
Leaf chromatography can be finicky. If the results are faint or entirely green, try again with one or more of these adjustments.
The strip is very pale
Your leaf extract may be too diluted. Use more leaves, less rubbing alcohol, and crush the leaves more thoroughly. Choose fresh, dark green leaves.
The pigments formed one green smear
Apply several small drops of extract to the same spot, allowing the paper to dry between applications. Make sure the starting spot stays above the liquid when the strip is placed in the glass.
Nothing traveled up the paper
Check that the bottom edge of the strip is touching the liquid. The strip should touch the solvent, but the pigment spot should not be submerged.
The results show only shades of green
That is still a valid result. Chlorophyll a and chlorophyll b are different pigments and may appear as different shades of green. The yellow and orange pigments may be too faint to see clearly in that leaf sample.
Different attempts produced different results
That is one reason repeating the experiment is valuable. Leaf species, growing conditions, paper type, alcohol concentration, and the freshness of the leaves can all affect the results.
Record the Leaf Chromatography Results
Attach the dried strips to a science or nature journal, or draw them if you prefer.
For each sample, record:
- The type of leaf
- Where the leaf was collected
- The date
- Whether the leaf grew in sun or shade
- The colors visible before the experiment
- The number and colors of the pigment bands
- Which pigments traveled farthest
- Any differences between leaf species
- Questions raised by the results
Older kids may also want to measure the distance each pigment traveled and compare it with the distance the solvent traveled.
Ask your kids to write a conclusion explaining what the chromatography experiment revealed about pigments in green leaves.
Nature Study Questions
Use some of these questions to continue the investigation:
- Why does chlorophyll usually hide the other pigments in a green leaf?
- Which pigments appear to be present in several leaf species?
- Do dark green leaves produce different results from light green leaves?
- Do leaves from sunny locations differ from leaves collected in shade?
- Why might two leaves from the same tree produce slightly different results?
- Why can chromatography reveal yellow or orange pigments without accurately predicting all the leaf’s autumn colors?
- What variables should remain the same when comparing different leaves?
- What would you change if you repeated the experiment?
More Chromatography Experiments
Once your kids understand chromatography with markers and leaves, try using the same scientific process in another investigation.
Chromatography Forensics Experiment
More Deciduous Tree Study
Deciduous trees are fascinating to study during every season. In NaturExplorers Delightful Deciduous Trees, you will find enough nature walks and extension activities to carry you through many fun, creative, and meaningful science lessons.

See More Tree Study Ideas
Continue your tree study with nature walks, seasonal observations, creative projects, and hands-on science activities.
Curriculum Connections
These resources can help you continue studying deciduous trees, seasonal changes, and nature throughout the year.
-

Delightful Deciduous Trees
$28.00 -
40 Nature Walks: Volume 1
$24.00 -
Creative Nature Walks
$24.00


Make Science Meaningful and Fun
Experience a free No Sweat Nature Study class to see how easy and engaging science can be.
Kid-friendly science through the lens of nature study
Creative nature journaling with every lesson
Flexible and fun for the whole family
Rubbing alcohol is hard to find. Will this the leaf pigments still bleed with just water in the cup? Are there other substitutes for the rubbing alcohol that would work?
I’m not sure if substitutes would work or not. It’s the solvent that separates dyes that are not water soluble. It wouldn’t hurt to experiment with a different solvent like vinegar, nail polish remover, or even drinking alcohol. Of course, all of these (including the isopropyl alcohol) require parental supervision.